
How to Upload Pictures to Pinterest A Simple Guide
25 July 2025
Ready to get your images in front of millions of potential customers on Pinterest? It all starts with the upload. Whether you want to create a single Pin on Pinterest, plan ahead using the native scheduler, or easily generate pins on Pin Generator, there's a method that fits your strategy.
Let's break down how to upload pictures to Pinterest using these three simple approaches.
Your Guide to Uploading Pictures on Pinterest
Pinterest is, at its heart, a visual discovery engine. That's why getting your images uploaded correctly is more than just a technical step—it's the foundation of your entire marketing effort on the platform.
Think about it: users save around 1.5 billion Pins every single week. And even more impressively, a massive 85% of Pinners say they’ve bought something based on images they discovered. These aren't just vanity metrics; they're proof that knowing how to upload pictures to Pinterest is a core business skill. You can dig deeper into Pinterest's impact on e-commerce with some eye-opening stats they've shared.
Core Uploading Methods
So, what's the best way to get your content on Pinterest? It really depends on your goals and how much time you have. Most creators choose one of three key methods:
- Creating a Single Pin on Pinterest: This is your go-to for getting one brilliant idea up right now. It's perfect for timely content or when you want to pour all your focus into a single, perfectly crafted image.
- Using the Native Scheduler: If you're a planner who likes to work in batches, Pinterest's own scheduler is your friend. It lets you set up your Pins in advance, ensuring you stay active and consistent without being tied to your desk every day.
- Generating Pins on Pin Generator Easily: For maximum efficiency, nothing beats automation. A tool like Pin Generator can take a single link or image and turn it into dozens of optimized Pins, handling the creation and publishing for you. It's a game-changer for scaling your efforts.
To help you decide which path to take, I’ve put together a quick comparison table.
Pinterest Upload Methods at a Glance
This table breaks down the three main ways to upload your images. Use it to quickly see which option aligns with your needs, whether you're prioritizing speed, control, or pure efficiency.
| Method | Best For | Speed | Effort Level |
|---|---|---|---|
| Manual Pin Creation | One-off ideas, maximum control, A/B testing designs | Slow | High |
| Pinterest's Native Scheduler | Batching content, maintaining a consistent schedule | Medium | Medium |
| Automation (Pin Generator) | Scaling content, saving time, ultimate efficiency | Fast | Low |
Each method has its place. I often find myself manually uploading a particularly important Pin, but I rely on scheduling and automation for the bulk of my content to keep a steady stream of traffic flowing.
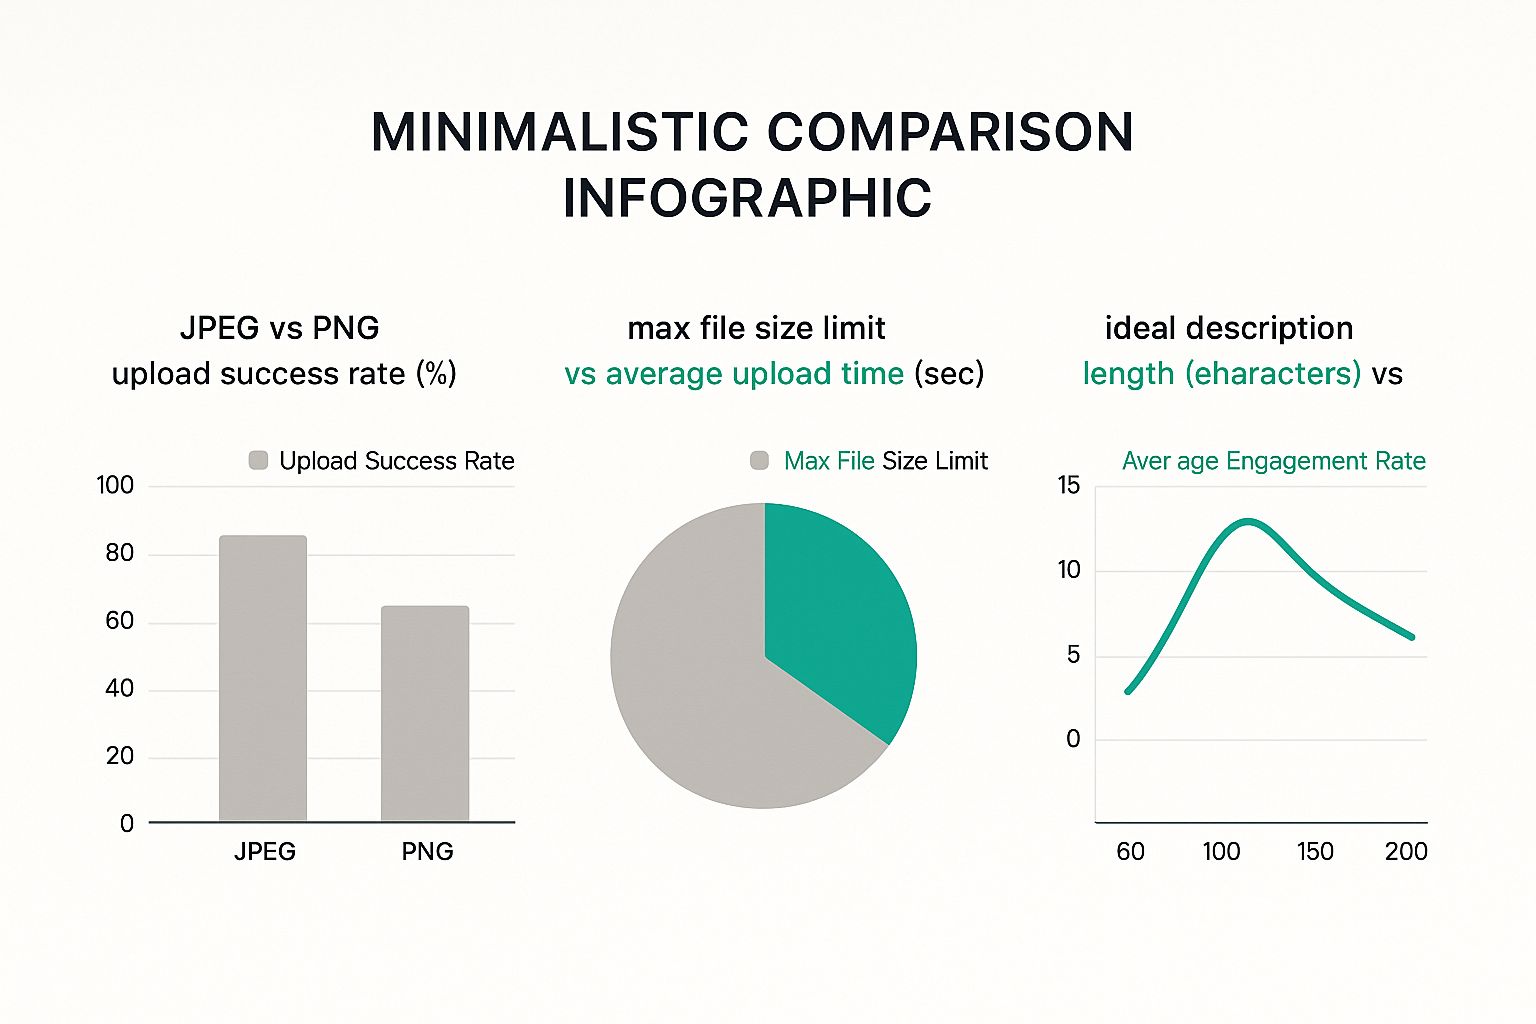
As you can see from the data, things like file type and description length aren't just minor details—they directly influence how many people will see and engage with your Pin. Getting these right from the start makes a huge difference.
The Direct Approach: Creating a Single Pin on Pinterest
Sometimes you have that one perfect image you need to get on Pinterest right away. This method gives you total, hands-on control over every last detail. It's the most direct way to get your picture live.
On either desktop or mobile, you'll just hit the “Create” button and choose “Create Pin.” This brings up the uploader where you can drag and drop your file or browse your device. But getting the image up is just step one—the real work starts now.
Crafting the Perfect Pin
Once your image is loaded, you'll see a whole set of fields: title, description, alt text, and the all-important destination link. This is where you transform a simple picture into a real asset for your brand.
- Choose the Right Board: Don't just dump it anywhere. Be specific. If you've got a new vegan pasta recipe, it belongs on your "Vegan Dinner Ideas" board, not a generic "Food" board. This helps Pinterest's algorithm understand exactly what your content is about.
- Write a Compelling Title: Your title is your hook. "Chicken Recipe" is boring. "Easy 30-Minute Lemon Herb Roast Chicken" is way more enticing and tells the user exactly what they're getting.
- Add a Keyword-Rich Description: Think like your audience. What words would they type into the search bar to find what you're offering? Weave those keywords naturally into a description that explains what the Pin is all about.
Pro Tip: Remember, Pinterest is a visual search engine, not just another social media site. You need to treat your Pin descriptions with the same SEO mindset you'd use for a blog post. Focus on what the user is looking for.
The interface for creating a Pin is pretty straightforward, as you can see below. It lays out all the fields you need to complete.
Every single element plays a part in your Pin's success. Don't skip the alt text! It’s crucial for accessibility and gives Pinterest even more context about your image, which can give you a nice little boost in search results. Going manual lets you get every one of these details just right.
Plan Ahead with the Native Pinterest Scheduler
Consistency is the key to winning on Pinterest. But who has time to manually upload Pins every single day? That's where uploading pictures to Pinterest through the native scheduler comes in, and it's a total game-changer.
This feature lets you get all your Pinning done in one focused session. Instead of a daily chore, you can knock out a week's or even a month's worth of content at once.
When you go to create a Pin, just upload your image like you normally would. But instead of hitting "Publish," look for the "Publish at a later date" option. A calendar will pop up, letting you pick the exact day and time you want your Pin to go live. You can schedule Pins up to 30 days in advance, which is perfect for planning around holidays, sales, or seasonal content.
Batching Your Content for Maximum Impact
This is where the real magic happens. You can upload a whole batch of images at once and then go through and tweak the title, description, and link for each one. Think about it: set aside one afternoon and you could have your entire month of Pins ready to go. Done.
This keeps your profile humming with fresh content, which the Pinterest algorithm loves, even while you’re busy with other things.
A solid plan is more than just throwing Pins at the wall. Understanding effective social media content scheduling strategies helps you build a rhythm and maintain the kind of steady presence that gets you noticed.
Scheduling your Pins isn't just a time-saver. It's how you build a reliable content engine that keeps driving traffic and engaging your followers. It’s the definition of working smarter.
For most creators and small businesses, Pinterest's native tool has all the firepower you need to build a strong, consistent presence.
Scale Your Efforts by Generating Pins on Pin Generator Easily
Manually uploading one picture at a time or even using Pinterest’s own scheduler works, but it’s not sustainable if you're serious about growth. For bloggers, e-commerce stores, or anyone managing a lot of content, this is where generating pins on Pin Generator easily completely changes the game.
Instead of a daily grind crafting individual Pins, your workflow can shrink to just a few minutes. You can take a single product page, a blog post URL, or even just one image and have a tool generate dozens of unique, optimized Pin designs from it automatically.
From One to Many, Instantly
Real automation isn't just about scheduling—it’s about handling the creative part for you. With a platform like Pin Generator, you can instantly spin up multiple versions of a single Pin. Each one can have different visuals, unique titles, and SEO-friendly descriptions.
This is a huge advantage because you can:
- A/B Test Designs: Effortlessly see which images, colors, and calls to action actually get clicks from your audience. No more guessing.
- Maintain Brand Consistency: Set up your brand templates once, and every Pin you generate will automatically match your established look and feel.
- Increase Posting Frequency: Dramatically ramp up the amount of fresh content you’re sharing. The Pinterest algorithm loves this.
Going beyond basic scheduling to automate social media posting is how you truly scale your Pinterest strategy. It frees you up to think about the big picture instead of getting lost in tedious, repetitive tasks. You’re building a system that works for you.
Pinterest absolutely rewards consistency. From what I’ve seen, successful accounts pin at least once per day. For a solo entrepreneur or small team, automation makes that goal not just possible, but easy.
By automating your Pin creation, you're not just getting time back; you're putting your Pinterest marketing on autopilot. You can generate and schedule hundreds of Pins in one sitting, ensuring your account stays active and drives traffic 24/7 without you having to be there. It’s the most powerful answer to "how to upload pictures to Pinterest" when you need to do it at scale.
Optimizing Your Pictures for Pinterest Success
Just uploading a picture to Pinterest is one thing, but getting it seen? That takes a bit more strategy. The Pins that truly take off aren't just pretty—they're intentionally designed to stop the scroll and play nice with Pinterest's visual search engine.
The first and most important rule of thumb is to always use vertical images. A 2:3 aspect ratio (think 1000 x 1500 pixels) is your best friend because it fills up more of the screen on mobile, which is where most people are browsing. This simple tweak makes your content instantly more prominent and harder to miss.
Of course, you also need to use high-resolution visuals. No one likes a grainy, blurry image. It looks unprofessional and gets scrolled past in a heartbeat. Crisp, clear pictures signal quality and help build trust with your audience. If your images aren't quite right, using an image resizer tool can help you get them to the perfect dimensions without losing quality.
Making Your Pins Stand Out
A great photo is a solid foundation, but to really get those clicks, you need to add some context. This is where text overlays and smart keyword use come into play.
A text overlay is your chance to tell people what your Pin is about at a single glance. Use bold, legible fonts to pop a headline right onto the image, like "5-Minute Healthy Breakfast Idea" or "Fall Outfit Inspiration." This communicates value instantly, so users know exactly what they’ll get when they click.
Pinterest is, at its core, a visual platform. In fact, 60% of users log on specifically to look at pictures. Your job is to pair stunning visuals with clear, benefit-driven text to create something truly irresistible.
Finally, think of your Pin titles and descriptions as you would any other piece of SEO content. Do a little research to find what keywords people are actually searching for, and then weave them naturally into your text. This is what helps your Pins show up in searches long after you’ve hit publish. It’s no wonder over 2 million advertisers are on the platform—they know that optimized visuals are the ticket to connecting with users.
If you're looking for a way to make this whole optimization process a lot faster, you should check out our guide on the Pinterest Pin Generator. It can help you create perfectly optimized Pins in just a few seconds.
Even if you feel like you've got a handle on Pinterest, a few questions always seem to pop up. Let's tackle some of the most common ones I hear so you can pin with confidence.
Can I Edit a Pin After It’s Published?
This is a big one. The short answer is yes, but it’s limited. You can go back and change a Pin's title, description, link, and even the board it's on.
What you can't change is the actual image or video. Once it's up, it's up for good. This is why it's so important to double-check your creative before you hit publish! If you spot a typo on the image itself, your only option is to delete the Pin and start over.
What Are the Best Image Specs?
People often wonder about the technical nitty-gritty of the image file itself. Here's my rule of thumb:
- For most standard images, JPG is your best bet. It keeps the file size down, which means your Pins load faster for users.
- If your Pin has sharp text overlays or needs a transparent background, go with a PNG. It preserves the quality and crispness you need for graphics.
How Many Pins Should I Post a Day?
Ah, the million-dollar question. Honestly, there's no single magic number that works for everyone. The real key isn't volume—it's consistency.
A study of successful accounts found a common thread: they all pin at least once per day. This doesn’t mean you have to burn yourself out creating brand new content every single day. It's about keeping a steady flow of fresh Pins, which can absolutely be a mix of new ideas and strategically reshared content.
This is exactly why automation and scheduling tools are a game-changer. They help you maintain that consistent presence without turning Pinterest into a full-time job. Getting these common questions answered clears the runway, letting you focus on creating amazing content that truly connects with your audience.
Ready to stop wasting time and start scaling your Pinterest presence? Pin Generator automates the entire Pin creation and scheduling process, turning your links and images into hundreds of unique Pins in minutes. Try Pin Generator today and put your Pinterest marketing on autopilot.


