
How to Use Pinterest Product Tags to Increase Sales (Without Getting Flagged)
13 June 2026
If you’re sharing affiliate links or product pages on Pinterest and not using product tags the right way, you’re likely missing out on traffic, and possibly putting your account at risk. Product tagged pins show up in Pinterest’s search and shopping feeds more often, which means more chances for your content to get seen, clicked, and converted.
Pinterest users are proven shoppers. According to a study with LiveRamp, people exposed to Pinterest campaigns spent 26% more per year than those who weren’t. That means if you’re posting content regularly, tagging products correctly could directly impact your sales, especially if you’re using affiliate links or run a small online shop.
What Is Pinterest Product Tagging and Why It Matters
Pinterest product tagging lets you attach a clickable product link directly to your pin. You can attach a link to your own store, a digital product, or an affiliate offer. When someone taps the tag icon on your pin, they’re taken straight to the product page, no extra steps required.
It’s a simple feature, but it carries a lot of weight. Pins with product tags are more likely to appear in Pinterest’s search results and shopping feeds, which gives them a better chance of getting seen and clicked. From Pinterest’s perspective, product tags help users find what they’re looking for and make it easier to shop. From your perspective, it’s a direct opportunity to increase outbound clicks and sales.
Product tagging works for both shop owners and affiliate marketers, as long as the affiliate program allows promotion on Pinterest. But that last part is important, because product tagging also comes with some rules. If you misuse the feature (even unintentionally), you could get your links blocked, your reach limited, or your account flagged.
Some of the most common red flags include:
- Tagging products that aren’t a true match for the pin content
- Linking through redirects or shorteners
- Using affiliate links from programs that don’t allow Pinterest promotion
- Skipping clear disclosure (like “#affiliate” in your description)
Because of this, we don’t recommend tagging every single pin manually from the beginning. Instead, we use a system that’s much easier to manage, and far more effective in the long run.
If you’d rather watch this walkthrough instead of read, you can check out the full tutorial on YouTube here:
How to Add Product Tags on Pinterest
Product tags can only be added directly inside Pinterest, and only to standard image pins. If you’re using video pins or idea pins, those cannot be edited after publishing, which means you need to plan ahead. For this reason, most creators use photo pins for product tagging, since you can go back and add or adjust tags later.
There are two main ways to tag products: on desktop or on the Pinterest mobile app. We recommend using desktop, since it’s faster, easier to navigate, and better for bulk workflows.
Here’s how to add product tags step-by-step:
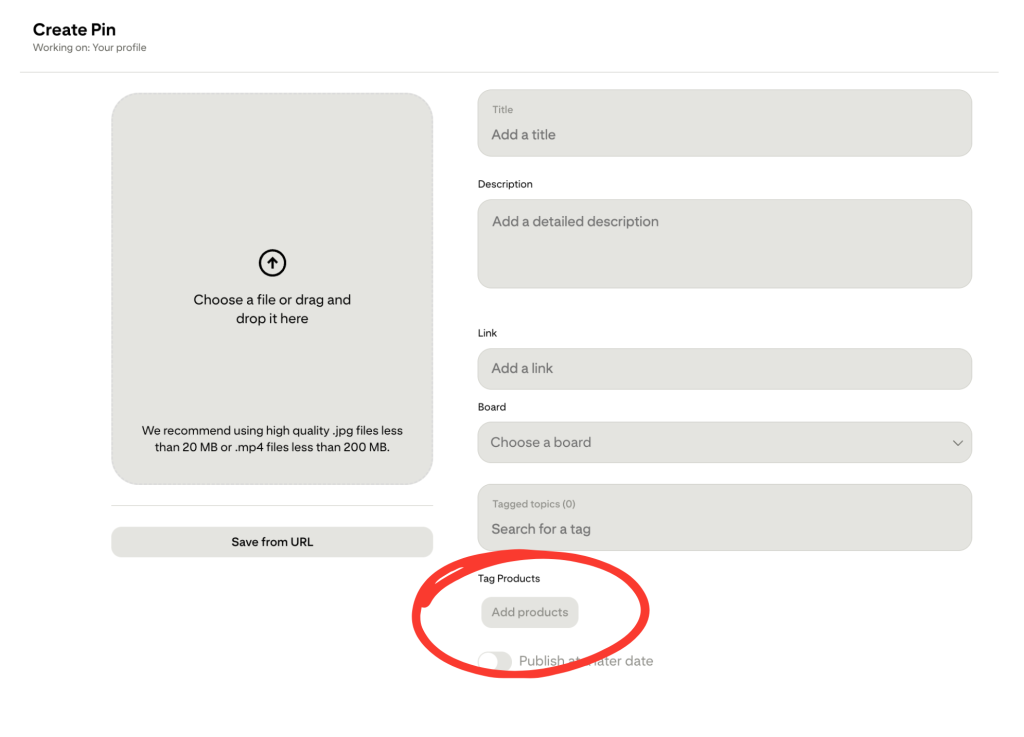
Start by creating a new pin. Upload your image, write your title and description, and add your URL if you’re including one. Under the image, you’ll see an option that says “Tag products.” Click that, and a search bar will appear. From there, you can either type in the product name or paste the direct URL. Pinterest will try to match your link to an existing product. Once it shows up, click to tag it.
There is no option to bulk tag pins and a third-party is not able to complete this. It must be done manually inside Pinterest.
This is why we recommend a scalable workflow – first, create and schedule pins in bulk using a tool like Pin Generator, then monitor performance and manually tag only the top-performing pins that are already getting impressions and clicks. It saves time, avoids over-tagging, and keeps your account safer in the long run.
Our Scalable Workflow: Bulk Create Pins & Tag Top Performers
Tagging every single pin manually isn’t realistic, and in most cases, it’s not even necessary. Instead of trying to tag everything up front, we recommend a simple system that lets you focus on what’s already working. It saves time, keeps your account in good standing, and helps you scale more consistently over time.
Here’s how we approach it:
First, we create a batch of image pins using Pin Generator. You can input a blog post, product page, or affiliate URL, and Pin Generator will scan the page and generate multiple pins with your branding, title, description, and links already included. This lets you go from zero to dozens of publish-ready pins in just a few minutes, without needing to design them manually.
Once your pins are created, publish them and let them sit for a few days. Don’t add any product tags yet. Pinterest’s algorithm needs a little time to collect engagement data, so it can start to show you which pins are actually getting traction.
After a few days, go into your Pinterest analytics and look at key metrics like impressions, pin clicks, and outbound clicks. From there, identify your top-performing pins (the ones Pinterest is already favoring in the feed) and only then go back and manually add product tags to those specific pins.
This method gives you two big advantages. First, you’re not wasting time tagging every pin you publish. Second, you’re tagging pins that already have momentum, which increases the chances that Pinterest will keep pushing them out. You’re working with the algorithm instead of trying to game it.
You can also use this process to test different types of content. For example, you might take one high-performing pin and duplicate it using Pin Generator, then tweak the call-to-action, link destination, or product image. This makes it easy to A/B test different affiliate offers, email opt-ins, or store links, all without starting from scratch.
If you want to fully automate the first part of this workflow, Pin Generator’s AutoPin feature can create and schedule pins for you using your saved templates, fonts, and colors. Then once a week, you can log in, check performance, and manually tag your top-performing pins.

Top Mistakes That Can Get You Flagged or Shut Down
Using product tags the right way can boost your visibility and drive more sales, but using them the wrong way can do the opposite. If Pinterest sees your account as overly promotional, misleading, or spammy, your reach can drop overnight. In some cases, links get blocked entirely or accounts lose distribution access without warning.
Here are the most common mistakes to watch out for:
1. Tagging every pin you publish
Using product tags on every single pin (especially when they link to affiliate products) can make your account look overly promotional. Pinterest may reduce your reach or flag your content as spam. Instead, post consistently, then tag only the pins that are already performing well.
2. Tagging unrelated products
Pinterest wants product tags to reflect what the pin is actually about. If you tag items that have nothing to do with the image, title, or description, your tag could get rejected or worse, your entire pin may be deprioritized in search.
3. Trying to edit video pins after publishing
Video pins and idea pins can’t be changed once they go live. That includes product tags, links, and descriptions. If you want the flexibility to test different links or add tags later, stick with standard photo pins.
4. Relying only on affiliate links with no original content
Pinterest values helpful, inspiring, and original content. If your account is made up entirely of affiliate links or product pushes, it’s less likely to get seen. Mix in blog posts, tutorials, inspiration boards, and educational pins alongside your tagged content.
5. Using AI tools the wrong way
Tools can help you move faster, but not if you’re mass-posting low-quality, unbranded pins. Pinterest still prioritizes quality. When you use tools like Pin Generator, make sure your pins look clean, branded, and actually useful to your audience.
Used the right way, product tags can be a powerful part of your Pinterest strategy.
If you want to make the whole process faster – bulk-creating pins, posting consistently, and tagging only the ones that perform – Pin Generator makes it easy.


