
Pinterest for Beginners: 5-Step Checklist
13 June 2026
Starting on a new platform can feel confusing, especially when you’re trying to set up something that actually works instead of guessing your way through it. Pinterest is one of the easiest places to grow when you understand the basics, and with more than 600 million people using it every month to search, plan, and shop, getting your account set up the right way can put your content in front of people who are already looking for what you offer.
This beginner-friendly Pinterest guide breaks everything down into five simple steps so you know exactly what to focus on. You’ll learn how to choose a niche, set up your business account, pick the right keywords, and create pins in a way that feels doable. We’ll walk through it all with clear explanations, visual examples, and resources you can use if you want to go deeper.
Step 1 – Choose Your Niche
The first thing you need to do when getting started on Pinterest is choosing a niche. This gives your account direction and helps Pinterest understand what your content is about so it can send the right people your way. Don’t overthink this step. You’re just picking the main topic you want to be known for.
Your niche should connect to the content you already have or plan to create. If you run a blog or online shop, use those categories as your base. If you’re brand new, choose the topic you can create the most content around. A niche can be something broad like travel, food, fitness, or home decor, and you can narrow it later as you learn what works.
If you need help determining the best niche and business strategy for you, we have a step-by-step guide to walk you through it.
Once you choose your niche, outline a few simple themes you’ll post about. For example, if you’re in travel, your themes might be packing lists, destination guides, and travel products. This makes your future keyword research and pin creation much easier and gives Pinterest a clear picture of your account from day one.
If you prefer to watch instead of read, we walk through each of these steps alongside a visual tutorial on YouTube. You can watch the video here:
Step 2 – Create Your Pinterest Business Account
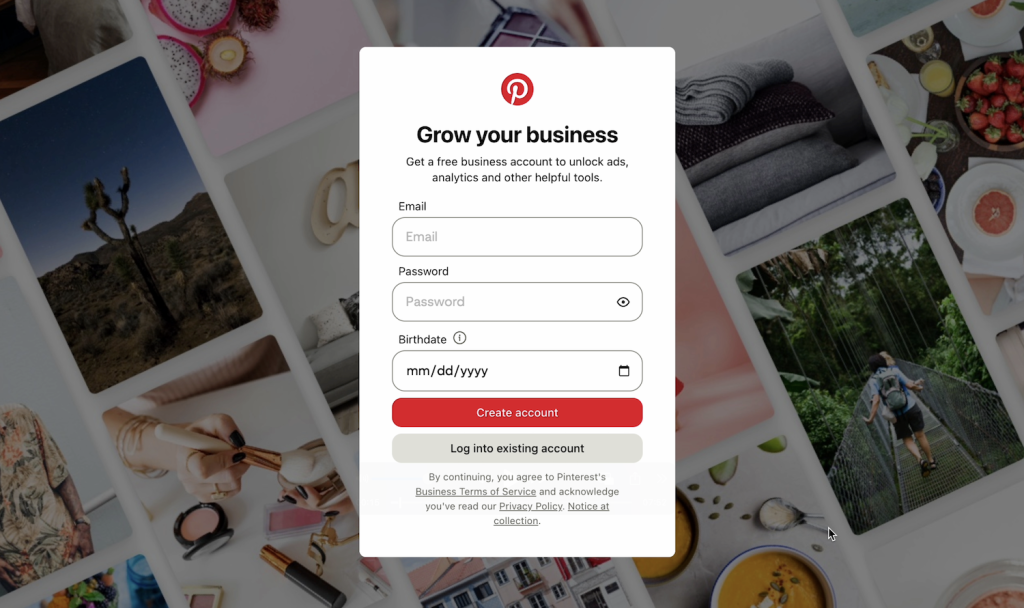
Once you know your niche, the next step is setting up your Pinterest Business account. A Pinterest Business account gives you access to analytics, product tagging, and the tools you’ll need to grow. It’s completely free and takes just a few minutes.
Head to pinterest.com/business/create to set it up. When you’re filling out your name and bio, keep your niche in mind. Use clear language that tells Pinterest (and real people) what your account is about. You don’t need to add a ton of keywords, but try to naturally include the main phrase people would search for. This helps Pinterest match your content with the right audience from the beginning.
If you’re unsure how to set up a business account, or want step-by-step instructions, we have a full tutorial (and YouTube video too).
If you already have a personal Pinterest account, you can convert it into a business one inside your settings. Just make sure the content is aligned. If your boards are all over the place, it may be cleaner to start fresh so Pinterest understands your focus right away.
Step 3 – Learn the Pinterest Basics
Before you start posting, it helps to understand how Pinterest works behind the scenes. Pinterest is a visual search engine, which means keywords, titles, and descriptions matter just as much as the design of your pin. When Pinterest knows what your content is about, it can send it to the right people for months or even years.
Start by getting familiar with a few core terms:
- Pinterest is the platform you’re using
- Boards are like folders or categories to organize your pins
- Pins are the graphics or videos that share your content or products and drive clicks to your site or shop
- Outbound clicks are when someone clicks out of Pinterest to visit your link
- Keywords are the search-friendly phrases you use in your pin titles, descriptions, and even on the image itself to help Pinterest know what your content is about
You don’t need to memorize everything before you start, but having a basic understanding makes the rest of the setup much easier, and it helps you create content that actually gets found instead of buried.
If you want a deeper walkthrough of the Pinterest fundamentals, we have a full guide that explains each term with examples.

Step 4 – Use the Right Keywords
Since Pinterest works like a search engine, keywords tell the platform what your content is about and who should see it. Using the right keywords can drastically improve your reach.
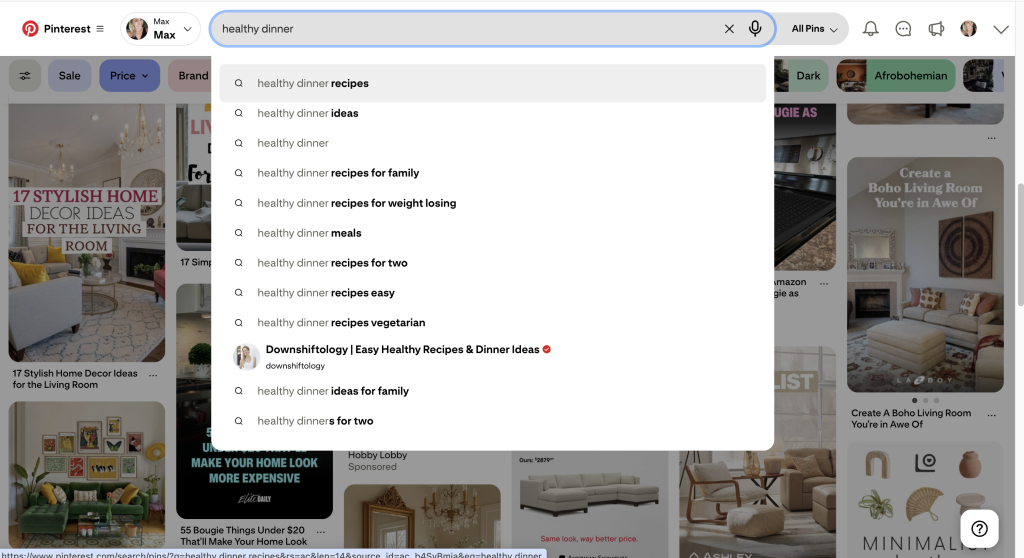
The easiest way to find strong keywords is by using Pinterest’s search bar. Start typing a topic like “meal prep,” “travel outfits,” or “DIY decor”, and look at the suggestions that pop up underneath. These suggestions come directly from real searches happening on Pinterest, which makes them perfect for your pin titles, descriptions, and even board names.
You don’t need a huge list. Just two or three keywords per pin is enough. Choose the phrases that best match what your content delivers. For example, if you write about travel packing, phrases like “packing list for women” or “carry-on essentials” might show up. Add those naturally into your title and description to help Pinterest connect your pins with the people searching for them.
If keyword research feels confusing, we have a detailed guide that walks through the entire process with examples and screenshots. It’ll help you understand how to choose keywords that actually get searched and how to use them correctly inside your pins.
Step 5 – Create and Schedule Your Pins (the easy way)
You’re finally ready to start creating pins. You can make every graphic by hand if you want, but if you’re short on time (or patience), there’s a much faster way to stay consistent.
A tool like Pin Generator can take a lot of work off your plate. Instead of writing titles, descriptions, and designing every pin yourself, you can paste in your blog post or product link and let it pull your images, create layouts, and write keyword-friendly descriptions for you. It gives you multiple versions instantly, and you can tweak the design or text so it matches your brand.
Once your pins look good, you can schedule them straight to Pinterest inside Pin Generator too. This keeps your account active all week without you needing to log in every day. If you want to go even further, there’s also an option to use AI to create new pins for you automatically, based on whatever’s already performing well.
This is the system we use to stay consistent without burning out, and it’s perfect if you want to keep posting but don’t have hours to spend creating content from scratch.
If you want to see exactly how it works, we have a full walkthrough showing how to create a month of Pinterest content in minutes.
Ready to get started? Pin Generator is completely free to try! You can test it out, or watch more of our YouTube videos to see if live and in action.


